


The Four Howitzer Defense in Ogre
by Chester Hendrix
Not many Ogre players like the Howitzer. That's a shame, because the Howitzer, when properly placed and used, can be a devastating part of your defensive style, especially in the Basic Game scenario against the Mark III Ogre. The problem is that most players don't use the Howitzer correctly.
When first playing Ogre, the average newcomer will grab one or two Howitzers. He usually does this for two reasons – 1) the obvious firepower and range, and 2) because taking more than one or two Howitzers will limit the amount of mobile armor units left for maneuvering around the Ogre. After a few bad experiences of not being able to get a hit with the Howitzers, or having them overrun without getting off more than a few shots – if any – the Howitzer quickly becomes the most unused unit in the game.
Admittedly, there is a basic problem in using the Howitzer. In utilizing only one or two Howitzers, you are left with the very real possibility that you may not get a shot before your position is overrun or wiped out. Since it can't move, a Howitzer must have effective support fire, or it will have a very short life once the Ogre comes within two or three hexes.
The key is in using three or four (preferably four) Howitzers and placing them so their cross fire is at once heavily concentrated and mutually supportive. Now, before any one Howitzer can be attacked the Ogre will have to undergo fire from the remaining Howitzers.
Your defense should revolve around defending the Howitzers first, and worrying about the Command Post later. I have found the best way to do this is to have your mobile ground forces throw everything in the first attacks at the Ogre's main battery. Any units left over should then go for the missiles if 2:1 odds or better can be achieved. Otherwise, hit the treads with any unused attack factors.
If still operational, the next Ogre armament target must be the missiles. The reason for initial attacks on the main battery is to provide ground units (and later the Howitzers) more protection by limiting the range of the Ogre. Always channel extra attack factors into hits on the treads. Every tread you hit means more turns to slow the Ogre down once he's within range of your Howitzers. This won't matter much if he still has his main battery and missiles intact.
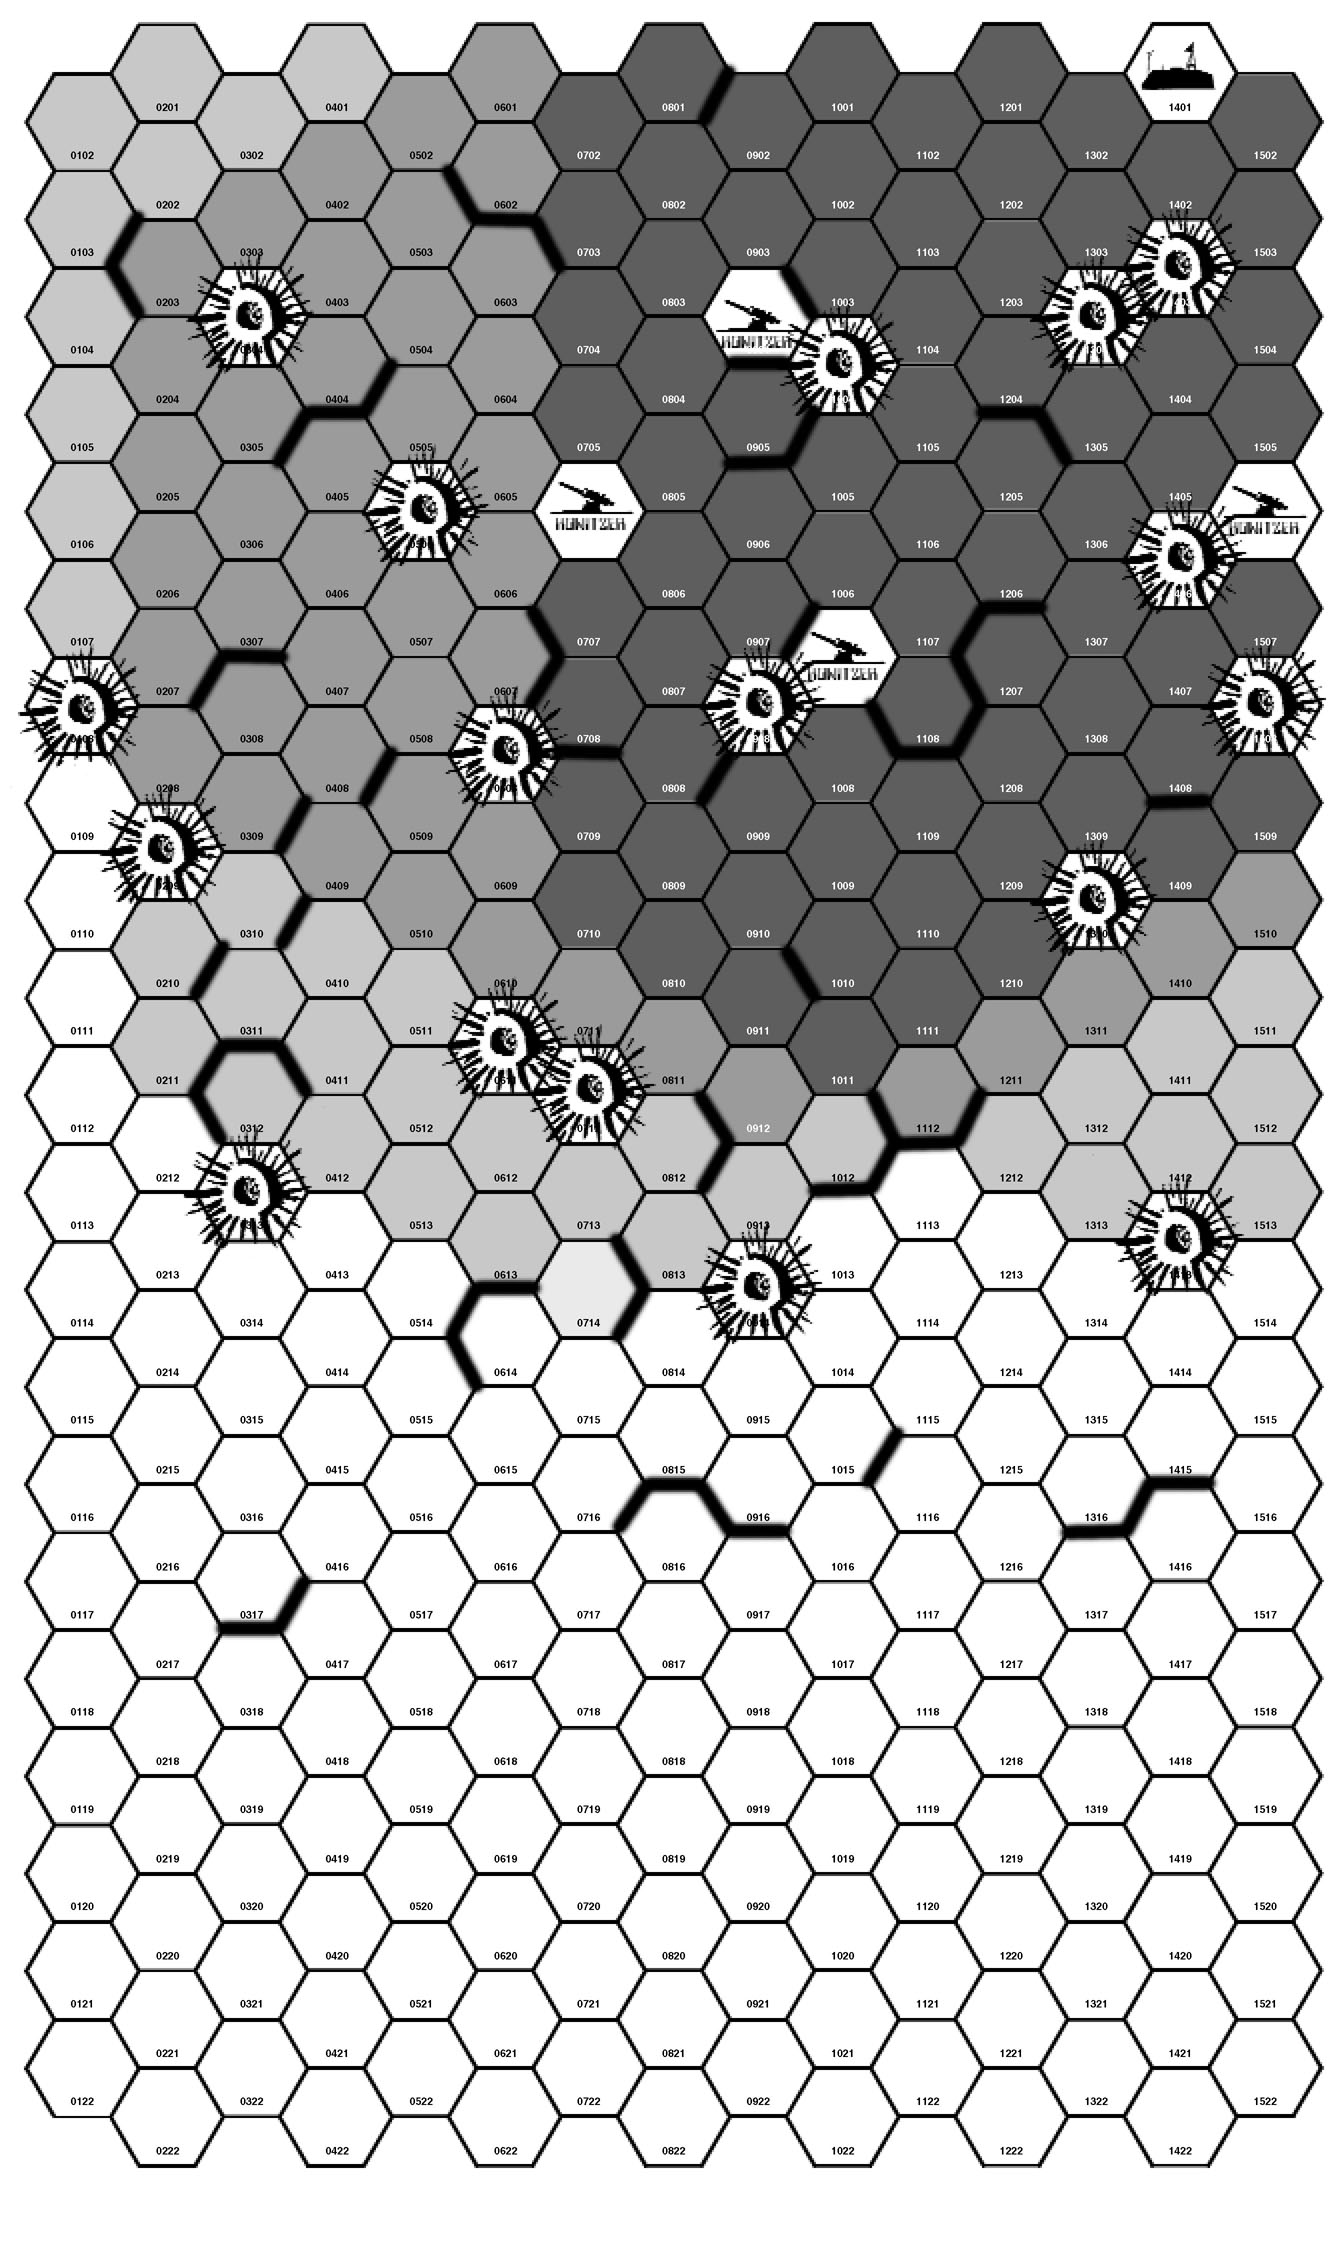
Placement of the Howitzers for maximum coverage and mutual support fire is crucial to your set up. The positions of the Howitzers in the diagram at hexes 1506, 1007, 0706, and 0904 gives you this effect. The Ogre cannot reach any Howitzer – except with missiles – without undergoing fire from at least three Howitzers for one turn. This is assuming the worst – the Ogre still has his full three movement factors. The less movement factors, the greater the mutual support capability.
You will notice each hex in the diagram is screened to show how many Howitzers can fire into each hex. The greatest concentration is closest to the Command Post, making it dangerous for the Ogre to get close until all Howitzers are taken out. This costs him valuable turns which can make the difference in a win or lose situation later on.
The Command Post should be positioned at hex 1401 in the northeast corner. (I was somewhat surprised when the gamer who introduced me to Ogre flipped when I showed him this Command Post placement. It had never occurred to him to place it anywhere but 0801 or 1001.) With the Command Post in the corner, the Ogre can attack more than one of the Howitzers (at 1007 and 1506) by advancing along the east edge of the map – the shortest route to the CP – if the missiles are still functional; by going west a couple of hexes (via 1308 or 1207) the Ogre can still take out both of these Howitzers even if the missiles are both gone, as long as the main battery is still intact. This is the real reason for knocking out the main battery and missiles.
If the Ogre has progressed along the east edge and you have knocked out the main battery and missiles, the Ogre must make a quick decision. A competent defensive player will have reduced the Ogre's main offensive powers and the treads by one movement factor, giving the Ogre two choices.
- Rush the Command Post. This leaves him vulnerable to the remaining Howitzers.
- Drive on the Howitzers. This wastes precious time which is needed to reach the CP and allows any surviving mobile defensive forces an excellent opportunity to stop him.
This basic strategy of setting up four Howitzers can be very effective in improving your defensive game. The element of surprise in opting for an unconventional force against a conventional player should not be minimized.
To summarize: After placement of the Howitzers, the first objectives are the main battery, missiles, and treads, in that order. At this point, you can sit back and let the Ogre sweat. Your main worry will be letting your troops be drawn out into the open and destroyed, leaving your Howitzers for defense. If the Ogre hasn't been reduced in offensive firepower and/or movement points, and this happens, you could be in trouble. But that's all right – you knew the job was dangerous when you took it.
