


Building Your Own Monopolis: It's a Game, Not a Diorama
by Mack Harrison
February 22, 2019
Do you love the game of Ogre, but don't like the fact that your minis or 3-D counters can't fit into a single hex? Want to have two Ogres share the same real estate without having to place one model on top of another? Then it's time to build your own Monopolis.
Monopolis is a shorthand term to describe my Ogre games using standard miniatures on a large hex map with 3-D terrain. My setup combines the straightforwardness of the board game with the visual appeal of a miniatures game. In constructing Monopolis, I used a variety of components, from board games, toys, model railroad supplies, and random bits, with the idea that combining the parts into a greater whole would make an aesthetically pleasing presentation. And whenever I started to worry about scale, I would remind myself that I was making a game, not a diorama.
I'm a longtime Ogre fan who picked up Deluxe Ogre and Deluxe GEV in the early 2000s. These sets came with metal miniatures and paper maps with hexes large enough to fit conventional armor units. While I also obtained the Ogre Miniatures rulebook, the ease of play on a hex map resulted in my preference for using minis with the hex-and-counter rules.

Although the Deluxe maps were fairly large, the huge nature of the eponymous cybertanks meant these models would take up two spaces on an already-crowded game board. While the rulebook stated that for purposes of play, the Ogre only occupied the front hex, this often led to confusion. Too many times, an opponent would base their tactics on the mistaken assumption that the giant robot tank occupied both hexes, when that was just an artifact of the size of the map. It wasn't easy to fit more than one of some of the other units into a single space, either.
So, loving the minis, loving the rules, and indifferent toward the map, I embarked on a project that would: 1) keep the hexes while providing enough room to fit my models comfortably; 2) allow modularity and facilitate gameplay; 3) be simple; and 4) not cost too much. I ended up with Monopolis, a game that keeps the board game rules on a large hex mat while adding custom terrain with both official, and some not-so-official, miniatures.
Materials: Here's what I used to build my own Monopolis:
Commerciallyavailable game mat (alternately, make your own)
Cardboard drink coasters (100 circular and 100 hexagonal)
Art board (optional)
Lichen (from model railroad supplies, various colors)
Static grass and flocking
Model trees (from diorama supplies, various colors)
Spray adhesive
Superglue
Tacky glue
Spray paints (from hardware stores, various colors)
Model buildings (multiple origins, the more, the better); my sources included:
Different editions of Monopoly (old and new versions: The World Here & Now Edition, Marvel Edition, Disney Edition, City Edition, etc.)
Toob building collections
Tri Ang 1/1250 die cast buildings
Small plastic bits: power cord prong covers, zip lock bag fasteners, etc.
An old bathroom fixture
Steel wool
Cotton balls
Toothpicks
Pennies (at one cent each, they're the perfect size and weight for markers or bases)
Circular adhesive labels
Game Mat: First, the big picture: how big do you want your game to be - literally and figuratively? The larger your hexes, the more minis you can fit into a single space. Conversely, the bigger the spaces, the less room to maneuver. To make a ridiculous example, imagine a six- by four-foot map with 12-inch hexes: while that's plenty of room to stack up all the cybertanks you want in a single space, there's not much room to maneuver. You've only got six hexes on the long axis, and about four on the short axis. A GEV can cross the whole map in a single turn. Now, think about that same area, but divided up into one-inch hexes: it would take that GEV at least 10 turns to get across, but you can only fit one or two in a single hex.
In other words, you will need to balance looks and playability. I found it helpful to print hexagons in various dimensions (two inches across, three inches across, etc.) on standard paper and then place my Ogres and buildings on them to see how they looked. Fiddling around with these arrangements led me to conclude that I would use four-inch hexes for my game. This gave me enough room to place buildings and still fit in the miniatures.
Once I decided on hex size, I needed to figure out how to get them onto a playing surface. I toyed briefly with the idea of creating my own gaming mat, but quickly decided that my hobby efforts were best focused on other projects. So, I purchased one instead.
A cursory internet search will return options for game mats in various fabrics, colors, dimensions, and hex size. Neoprene maps will lay flat and not move too much during play, and since they're rolled up they won't get creases. Cloth mats, on the other hand, may show signs of creasing, but their foldability makes for easier transport. You should also consider the type of climate where your scenarios will take place. Does your backstory involve a blasted wasteland reminiscent of the original Mark III Attack scenario from Ogre? Is your battleground going to be a desert nation or an arctic outpost? Or do you envision a generic temperate area like the GEV maps?
Whatever you decide, there's a mat out there for you. I ended up going with an 80-inch by 50-inch heavy felt Open Fields mat from Corsec Engineering. Four-inch hexes were printed on the mat. While not as detailed or realistic as some other offerings, my purchase did have shading variations that emulated slight changes in elevation and vegetation. I figured that once I got the various terrain and other set dressing on the board, the muted colors of the playing surface would tie the whole game together.


Having figured out my playing surface, I now had to come up with a way to fill all of those empty hexes. As I was porting over the board game, which includes rules for damaging and destroying terrain, I couldn't build a single huge cityscape. Each town and forest hex had the potential to be bombarded into rubble, so I needed lots of modular pieces that I could drop in or remove from a single hex. Thus, the coasters, which at four inches across were a perfect match for the hexes. As I wanted to map out a large urban area, that meant a lot of coasters. Searching online, I snagged a pack of 100. Each coaster would be used to represent a specific terrain type.
Rubble: I took about half the circular coasters and gave them a once- or twice-over with black and brown spray paints to give me a nice charred effect. After they were dry, I coated the disks with the spray adhesive and dipped them into the model railroad ballast mix. I repeated the spray glue application and added more rubble until I got the bombed-out vibe I was looking for. I made about 50 of these rubble counters because I planned on using Cruise Missiles in my games, and those entail lots of terrain destruction.
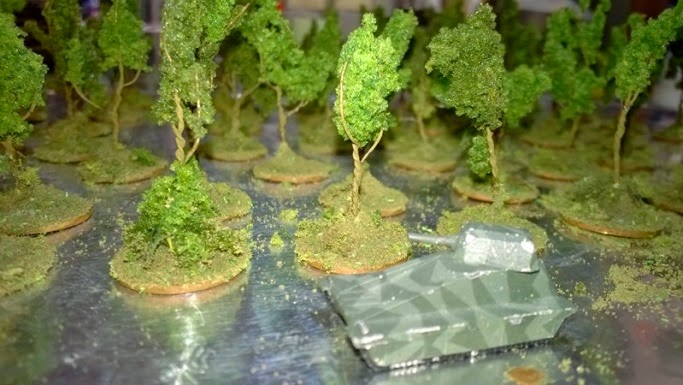
Forest: Confession time: I didn't use coasters for my forest hexes. Instead, I had art board that I cut into rough shapes about the size of a hex, with a few half-hexes in case I needed to have a road going through the woods. I wanted a more organic look that avoided cookie-cutter pieces of terrain. Once I had my various bases cut from the art board, I sprayed them with the adhesive. I then poured on static grass and flocking. After that, more spray-on glue and then a mix of lichen.

Swamp: As with the forest, I cut the bases from art board, this time a light blue color. Since swamps can't be damaged or destroyed in the Ogre rules, there's no need to ever replace a swamp with rubble. Therefore, unlike with the other Monopolis terrain, I created a couple of multi-hex swamp pieces. However, I was frugal with the flocking and static grass. I only used a thin layer sprinkled over the spray glue, so that you could still see most of the blue board beneath it. After the grass and flock was in place, I sparely applied the lichen, using it to delineate spaces on the multi-hex pieces.

Water: My initial attempt to create a lake involved a piece of art board, some blue paint, and a glued-on acetate overlay for gloss. Don't repeat my mistake. Instead, do what I did on my second try: I bought a pack of hexagonal cardboard coasters online and used old business cards to attach the coasters to one another in rows of two or three. After that, I coated the assembled hexes in glossy blue paint. I have enough of these to make a river or a large lake. Although they are not precisely the size of the hexes on my mat, they're close enough for gaming purposes.


City: Putting together the various city tiles was the most entertaining part of this project. In addition to the traditional houses and hotels from the original version of the board game, Monopoly, I had different shaped dwellings from variant editions, and even skyscrapers from Monopoly City Edition. There were also buildings from the Toobs line of toys, random plastic bits, and some 1/1200 die cast structures I found at a flea market. The various styles of buildings allowed me to create distinct neighborhoods on a single coaster and bring Monopolis to life. However, this portion of the build required a little more setup.
First, I sprayed the coasters a nice, concrete-looking shade of gray. When they were done, I took all the brightly colored game pieces and separated the various buildings, hotels, and houses to see how many pieces I had of each style. Then I separated each style into a number of sized groups equal to the spray paints I wanted to use: mostly gray, white, tan, and brown. I threw in the smaller bits as well. Getting these pieces painted is tricky; the blast from those rattle cans will blow them around if they're not secured. To remedy that, I sprayed glue on some aluminum foil-covered cardboard. After giving it a few minutes to lose some stickiness, I pushed the building tokens onto the foil, and the adhesive kept the pieces in place. I then applied the different paint colors to the groups of buildings. Once the paint was dry, it was easy to pull the models off the foil.

Once I had my buildings all dressed up and ready to go, I played around with various configurations: similar styles of houses in this neighborhood, a more eclectic mix in that one. I was able to make some industrial areas, a nice-looking downtown section with plenty of high-rise buildings, a university, and even a prison. I left a few one-inch-wide corridors on some of the city coasters, so I could fit roads on them. After my neighborhoods were all platted out, I superglued the models to the coasters.
Although you might want to use the same style of buildings for certain hexes, it helps the look of your city to vary the types of structures and the colors in a single hex. Uniformity tends to look more toy-like. The more variety you have, the more true-to-life your city will appear.
When assembling your own Monopolis, don't be afraid to go further afield in your sourcing: I affixed a section of a broken bathroom hand towel holder to its own coaster for a nice, sci-fi looking arcology. As soon as my players saw this feature on the table, they immediately started referring to it as "the Pfizer Building." When participants name your kit-bashed terrain features, it means they've bought into your setting.
Craters: While I was still in the planning stages for Monopolis, I was walking through a hardware store when I came across a package of extra coarse sanding discs that immediately screamed, "CRATER!" to me. These hardware accessories have a brown surface holding abrasive 1- or 2- millimeter bits of grayish-black aluminum oxide that reminds me of the craters on the Ogre board game map. At five inches diameter, these discs overlap the hexes on my mat, but since they're supposed to represent the site of a megaton Cruise Missile detonation, that's OK.

Roads: At first, I used some gray, fine grain sandpaper that I cut into 1-inch strips; no painting required. While the texture gave a nice road effect, the paper strips were too light and slid around too often during play. They also started to curl up while stored with other materials. So, I later picked up some strips of basswood: 1/32 inches thick by 1 inch wide by 24 inches long. A quick spray of gray paint gave me more durable sections of highway that don't get moved around so easily.
Railroad: Because Monopolis needed public transportation, I acquired a Micro Machines bullet train and track segments on the secondary market. The railway vehicles were out of scale compared to the Ogre miniatures and the other terrain features; but again, I wasn't making a diorama. And two cars with an engine at each end pretty much stretched across a pair of four-inch hexes; a perfect fit with the rules that declare a train is two hexes long, with front and rear sections.

Scatter terrain: These are little bits of scenery which have no effect on game play but may have a tremendous effect on the look of your table. By sprinkling these tokens around otherwise undecorated hexes, you can add detail to the map that helps bring it to life. Here are some objects that I used:
Trees: I bought "wire foliage branches" in two colors and based them on pennies to make individual trees. These provide a nice garnish to forest hexes without getting in the way of miniatures, or they can liven up an otherwise empty space on the map.
Buildings: I ran out of coasters before I ran out of Monopoly structures, so I bought a pack of small wooden rectangles in various sizes and used them to base the remaining buildings. These can be used to make additional town hexes - especially next to roads - or just scattered about the countryside. Distinctive structures, like the three castles from the Monopoly Disney Edition that I combined into one large castle, can also be used as scenario objectives.
Automobiles: I found some 1/300 scale automobiles being sold online under the category of architectural models. These were inexpensive from overseas, so I bought several hundred of these tiny cars. I painted them in the same manner as the buildings, in mass lots of assorted colors, but first I painted the undersides black (since I knew these would easily get knocked upside down). When I place these vehicles into town hexes and along roads, they bring Monopolis to life.
Lichen and gravel: You will have fragments of lichen or bits of gravel come off of their mounting surface. Don't throw them away; recycle! Scatter that stuff around empty spaces on the map to fill in those clear hexes.
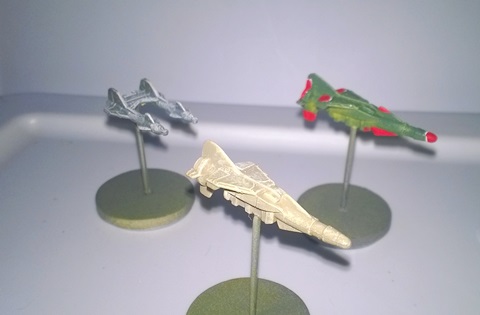
Other: Maybe you have a model you like, but it's the wrong scale, or not really something you can use as an Ogre unit. Put it on the board as an objective, or just as eye candy. I've used a tiny model airliner and a large toy sci-fi vehicle in the same game. Remember, this isn't a diorama!

Game aids: Once everything is added, you have a great looking map. But since the whole shebang is there for the players to blow up, you need some play aids to help with the destruction.
To indicate a damaged town or forest hex, I use tufts of steel wool (found at the home improvement store) straight out of the package for smoke. Once the hex is destroyed, you just replace it with a rubble hex; I generally leave the smoke in the rubble hex to give an impression of still-raging fires.
For disabled vehicles, I follow the suggestion from Ogre Miniatures to use puffs of cotton. Some of the puffs are left white, and others spray-painted yellow. I use the different colors on alternating turns to keep track of when a disabled unit will recover.
Regarding destroyed vehicles, while Ogre Miniatures does have rules for bombed-out hulks, there is no need to keep track of eliminated units in the conventional rules. That said, I think indicating where each unit was taken out is a nice ongoing way for the table to reflect the lethality of the battle. To that end, I stuck circular labels on pennies and then painted them the same way I did my rubble hexes (because of how they're used in the game, my players call them death pennies). I then added a little steel wool for a smoke effect to make some nice destroyed vehicle markers. If you want to use these, make sure you have a lot of death pennies on hand.
Cruise Missiles are always a hit with players. Therefore, it was worth the investment for me to get the large nuke blast marker from Litko Game Accessories. This acrylic model is pricey, but it spans a Monopolis hex and looks great on the table when the nuclear warhead detonates.
Speaking of Cruise Missiles, I took some small plastic missiles from an old line of diecast toys (Mega Force by Kenner, if you are interested) and mounted them on flight stands. The stands were easy: I glued a one-inch wooden disk to a fender washer and drove a nail up from the bottom, gluing the plastic missile to the nail's point. This way, players can more easily keep track of the missiles' flight paths . . . and which units are in range to shoot them down.
In conclusion, I've shared with you how I built my Monopolis, but this method isn't the only way to get there. I'm sure there are plenty of modeling techniques or sources that I would kick myself for missing. Feel free to try those, or something someone else suggested. The main thing is to get to your own Monopolis . . . and there's more than one road that will take you there. In the end, all that matters is that you're happy with it. And remember, it's a game, not a diorama!

The Ogrezine II PDF, combining all of these articles with additional new material, will be available on Warehouse 23.